link:{sourcedir}/gradle.properties[role=include]Table of Contents
3 Writing the Application
Since the application requires GORM 6.1.x, the first step is to set your GORM version within gradle.properties:
gradle.properties
3.1 Setup Multi-Tenancy
3.1.1 The Multi-Tenancy Mode
In order to use Multi-Tenancy you need to setup the Multi-Tenancy mode that GORM uses, given that three distinct modes are supported:
-
DATABASE - Use a distinct database connection per tenant
-
SCHEMA - Use a single database, but different physical schemas per tenant
-
DISCRIMINATOR - Use a single database, but partition the data using a discriminator column
Generally DATABASE and SCHEMA modes can both be considered to be physically separated, whilst DISCRIMINATOR mode requires more care since different tenants' data is stored in the same physical database:
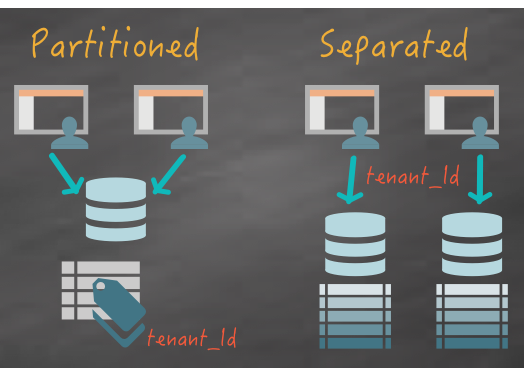
In this case the required Multi-Tenancy mode is DATABASE and it can be configured using the grails.gorm.multiTenancy.mode setting:
grails-app/conf/application.yml
link:{sourcedir}/grails-app/conf/application.yml[role=include]
link:{sourcedir}/grails-app/conf/application.yml[role=include]
link:{sourcedir}/grails-app/conf/application.yml[role=include]
3.1.2 The TenantResolver
Note that, in addition to the mode, the above example configures the tenantResolverClass to use to resolve the tenant.
The tenantResolverClass is a class that implements the TenantResolver interface.
Included within GORM there are several built-in TenantResolver implementations including:
| Type | Description |
|---|---|
Resolves the tenant id from the HTTP session using an attribute called |
|
Resolves the tenant id from the HTTP cookie using an attribute called |
|
Resolves the tenant id from the current sub-domain. For example if the subdomain is |
|
Resolves the tenant id from a system property called |
The above implementations are useful to have out-of-the-box, however GORM is flexible and you can implement your own strategy by implementing the TenantResolver interface.
For example if you are using Spring Security you could write a TenantResolver that resolves the tenant id from the currently logged in user.
|
For this example we are going to be using SessionTenantResolver and storing the tenant id within the current user session.
3.1.3 Multiple Data Sources
Apart from the default dataSource, we configure two additional data sources
audi and ford for each of the tenants:
grails-app/conf/application.yml
link:{sourcedir}/grails-app/conf/application.yml[role=include]The names of the data sources correspond to the tenant ids that the configured TenantResolver should return.
If the default data source can also be considered a tenant then the value of ConnectionSources.DEFAULT should be returned as the tenant id.
|
3.2 Creating the Domain Classes
When creating domain classes for your application you will typically have domain classes that are Multi-Tenant and others that are not.
For domain classes which won’t be using Multi-Tenancy simply define them as you would normally do and they will be mapped to the default dataSource.
For this example the Manufacturer will be the provider of tenant ids. The name of the Manufacturer will be used as the tenant id allowing access to each configured database:
grails-app/domain/example/Manufacturer.groovy
link:{sourcedir}/grails-app/domain/example/Manufacturer.groovy[role=include]Next step is to define domain classes that can only be accessed by a given tenant:
grails-app/domain/example/Engine.groovy
link:{sourcedir}/grails-app/domain/example/Engine.groovy[role=include]grails-app/domain/example/Vehicle.groovy
link:{sourcedir}/grails-app/domain/example/Vehicle.groovy[role=include]| 1 | Both domain class implement the MultiTenant trait |
The Vehicle and Engine domain classes both implement the MultiTenant trait which results in GORM resolving the database to use from the resulting tenant id returned from the configured TenantResolver.
3.3 Setup Test Data
To setup some test data you can modify the Application class to implement the ApplicationRunner interface to run transactional logic on startup:
grails-app/init/example/Application.groovy
link:{sourcedir}/grails-app/init/example/Application.groovy[role=include]| 1 | Implement the ApplicationRunner interface |
| 2 | Mark the run method as transactional with @Transactional |
| 3 | Use saveAll to save two Manufacturer instances |
In the example about two Manufacturer instances are saved that will correspond to the two tenants supported by this application. The names Audi and Ford are used and correspond to the names of the data sources configured in grails-app/conf/application.yml.
3.4 Implementing Tenant Selection
The first step to supporting Multi-Tenancy in your application is implementing some form of tenant selection. This could be to resolve the tenant via a DNS subdomain, or it could be part of your applications registration process if you are using authentication with Spring Security.
To keep things simple for the example we are going to implement a simple mechanism that provides a UI to store the tenantId within the users HTTP session.
First create a new ManufacturerController use create-controller or your preferred IDE:
$ grails create-controller ManufacturerNext modify the UrlMappings.groovy file to map the root of the application to the index action:
grails-app/controllers/example/UrlMappings.groovy
link:{sourcedir}/grails-app/controllers/example/UrlMappings.groovy[role=include]Then define an index action that lists of all the Manufacturers and renders the grails-app/views/index.gsp view.
grails-app/controllers/example/ManufacturerController.groovy
link:{sourcedir}/grails-app/controllers/example/ManufacturerController.groovy[role=include]
link:{sourcedir}/grails-app/controllers/example/ManufacturerController.groovy[role=include]
link:{sourcedir}/grails-app/controllers/example/ManufacturerController.groovy[role=include]
link:{sourcedir}/grails-app/controllers/example/ManufacturerController.groovy[role=include]
link:{sourcedir}/grails-app/controllers/example/ManufacturerController.groovy[role=include]
Within the grails-app/views/index.gsp file, simply iterate through each result and create a link to the select action
grails-app/views/index.gsp
link:{sourcedir}/grails-app/views/index.gsp[role=include]The select action, selects the current tenant and stores the tenant within the current user’s HTTP session:
grails-app/controllers/example/ManufacturerController.groovy
link:{sourcedir}/grails-app/controllers/example/ManufacturerController.groovy[role=include]| 1 | Fetches a Manufacturer identified by the supplied id |
| 2 | The selected tenant is stored within a session attribute. |
The select action will find a Manufacturer and store the name of the Manufacturer (in lower case so it corresponds to a configured data source) as the current tenant within the HTTP session.
This causes SessionTenantResolver to resolve the correct tenant id from the HTTP session.
Finally, to improve error handling you can map every occurrence of TenantNotFoundException to redirect back to the list of manufacturers:
grails-app/controllers/example/UrlMappings.groovy
link:{sourcedir}/grails-app/controllers/example/UrlMappings.groovy[role=include]With these changes in place you will able to select each tenant from the homepage:

Now that it is possible to select a tenant, lets create a logic that is able to use the currently active tenant.
3.5 Writing Multi-Tenant Aware Data Logic
One of the challenges with regards to building an application that uses a unique database connection per tenant is that you have the manage multiple persistence contexts in a scalable manner.
It would not scale to bind a Hibernate session for each and every tenant to each request that came into the application, so you have to be able to write logic that takes into account the fact that the Hibernate session you are using to access the current tenant’s data is not currently bound to the current controller action’s execution.
To make this challenge simpler GORM features a set of Multi-Tenancy transformations including:
| Type | Description |
|---|---|
Resolves the current tenant and binds a Hibernate session for the scope of the method |
|
Resolves a specific tenant and binds a Hibernate session for the scope of the method |
|
Execute some logic within a method without a tenant present |
These should generally be applied to services in a Grails application and they work really well when combined with the GORM Data Services concept introduced in GORM 6.1.
To implement the logic to save and retrieve Vehicle instances create a new grails-app/services/example/VehicleService.groovy file and annotate it within the CurrentTenant and Service annotations:
grails-app/services/example/VehicleService.groovy
link:{sourcedir}/grails-app/services/example/VehicleService.groovy[role=include]
}| 1 | The Service transformation will ensure any abstract methods that can be implemented by GORM are implemented |
| 2 | The CurrentTenant transformation will ensure any method that is executed on the service resolves the current tenant first and binds a Hibernate session for the resolved database connection. |
The class is abstract because many of the methods will be implemented for you by GORM.
|
Now lets take a look at how to implement querying logic for a Multi-Tenant application.
3.5.1 Executing Multi-Tenant Aware Queries
To implement Multi-Tenant queries in a GORM Data Service simply add abstract methods that correspond to one of the supported conventions in GORM:
grails-app/services/example/VehicleService.groovy
link:{sourcedir}/grails-app/services/example/VehicleService.groovy[role=include]| 1 | Each query method is annotated with @Join |
| 2 | The list method returns a list of Vehicle instances and takes optional arguments as a map to perform pagination |
| 3 | The count method counts the number of Vehicle instances |
| 4 | The find method finds a single Vehicle by id |
The usage of @Join warrants further explanation. Recall that in a Multi-Tenant application a new Hibernate session is created for the connection found for the current tenant id.
Once the method completes however, this session is closed which means that any associations not loaded by the query could lead to a LazyInitializationException due to the closed session.
It is therefore critical that your queries always return the data that is required to render the view. This typically leads to better performing queries anyway and will in fact help you design a better performing application.
The @Join annotation is a simple way to achieve a join query, but in some cases it may be simpler to use a JPA-QL query.
Now it is time to write a controller that can use these newly defined methods. First, create a new grails-app/controllers/example/VehicleController.groovy class with either the create-controller command or your preferred IDE.
The VehicleController should define a property referencing the previously created VehicleService:
grails-app/controllers/example/VehicleController.groovy
link:{sourcedir}/grails-app/controllers/example/VehicleController.groovy[role=include]
    ...
}
Now run grails generate-views to generate some default GSP views that can render the Vehicle instances:
$ grails generate-views example.VehicleNext add an entry into the UrlMappings.groovy file to map the /vehicles URI:
grails-app/controllers/example/UrlMappings.groovy
link:{sourcedir}/grails-app/controllers/example/UrlMappings.groovy[role=include]Now you are ready to add the query logic to read Vehicle instances for each tenant. Update VehicleController with the following read operations:
grails-app/controllers/example/VehicleController.groovy
link:{sourcedir}/grails-app/controllers/example/VehicleController.groovy[role=include]

link:{sourcedir}/grails-app/controllers/example/VehicleController.groovy[role=include]
Both the find and show actions use the VehicleService to locate Vehicle instances. The VehicleService will ensure the correct tenant is resolved and the correct data returned for each tenant.
3.5.2 Executing Multi-Tenant Updates
To add logic to perform write operations you can simply modify the VehicleService and add new abstract methods for save and delete:
grails-app/services/example/VehicleService.groovy
link:{sourcedir}/grails-app/services/example/VehicleService.groovy[role=include]

link:{sourcedir}/grails-app/services/example/VehicleService.groovy[role=include]
The above save and delete methods will be implemented automatically for you.
GORM Data Services are smart about adding appropriate transaction semantics to each method (for example, readOnly for read operations). However you can override the transaction semantics by adding the @Transactional annotation yourself.
|
To implement updates you can add a new method that calls the existing abstract find method:
grails-app/services/example/VehicleService.groovy
link:{sourcedir}/grails-app/services/example/VehicleService.groovy[role=include]This demonstrates an important concept of GORM Data Services: It is possible to easily mix methods you define with ones that are automatically implemented for you by GORM.
The corresponding controller actions to call VehicleService and expose these write operations are also trivial:
grails-app/controllers/example/VehicleController.groovy
link:{sourcedir}/grails-app/controllers/example/VehicleController.groovy[role=include]

link:{sourcedir}/grails-app/controllers/example/VehicleController.groovy[role=include]

link:{sourcedir}/grails-app/controllers/example/VehicleController.groovy[role=include]